


On Sun, 8 Oct 2023 04:08:55 -0700, Don Y <blockedofcourse@foo.invalid> wrote:>I need to mount (many) RGB indicators at right angle >to the PCB (i.e., so the light travels parallel to the >plane of the PCB) > >The entire assembly needs to be *really* thin. > >Using SMT components, it seems like I'd have to use >lightpipes to bend the light (typically emitted normal >to the PCB). This will add to the thickness of the assembly >(board thickness + component + pipe) > >A better approach might be to use leaded components >mounted on their sides AT the edge of the PCB and >selecting them for smallest diameter possible (as >this would conceivably be the largest dimension in the >assembly's thickness). > >I'm looking for ~100K qty (LEDs) and can provide my own >drive electronics (I looked at the "RGB LEDs with integrated >drivers" and came up lacking). > >Another alternative might be SMT devices shining *through* >the PBC into pipes -- the thickness of the PCB offsetting >some of the required "height" of the pipe as it navigates >its bend) > >I can't think of any other alternatives...I've used top-firing leds under a square rod of lexan, machined along its length and painted white on the machined surface. Viewed from the side, the eye sees the led projecting on the white angled surface. Avoids annoying LED brightness while still differentiating between adjacent indicators. Stick as many emitters as you want, side by side - just cut the lexan rod to length to cover the group. This was for battery charging/discharging/fault indicators. paint this surface > /l < view this surface. illuminate from this ^. RL
right angle RGB leds
Started by ●October 8, 2023
Reply by ●October 8, 20232023-10-08
Reply by ●October 8, 20232023-10-08
On 10/8/2023 7:37 AM, Lasse Langwadt Christensen wrote:> søndag den 8. oktober 2023 kl. 15.45.37 UTC+2 skrev Don Y: >> On 10/8/2023 4:26 AM, Clive Arthur wrote: >>> On 08/10/2023 12:08, Don Y wrote: >>>> I need to mount (many) RGB indicators at right angle >>>> to the PCB (i.e., so the light travels parallel to the >>>> plane of the PCB) >>>> >>>> The entire assembly needs to be *really* thin. >>>> >>>> Using SMT components, it seems like I'd have to use >>>> lightpipes to bend the light (typically emitted normal >>>> to the PCB). This will add to the thickness of the assembly >>>> (board thickness + component + pipe) >>> >>> <snip> >>> >>> Right angle RGB SM LED, first one found... >>> >>> https://www.digikey.co.uk/en/products/detail/everlight-electronics-co-ltd/EASV3015RGBA0/6156087 >> I'm confused by the datasheet's dimensioning; on page 8, it appears >> that the "dome" portion stands UP from the board instead of lying >> on it. (i.e., the second illustration is labeled "Side" when >> one would think it should be "Top"?) > > bottom right shows it mountedYes, a TOP view -- the lands on the PCB are clearly visible "under" the device. But, note the "Side" view (above and to the left) shows the same shape. (side should be "elevation" -- which should yield a height/thickness figure)> drawing says 1mm, how thin do you need?I only see "1" referenced in the "Top" drawing. Their notion of "top" seems couterintuitive. I can make 1mm work -- if that is actually the nominal height of the component above the surface of the PCB (if I keep components off the back side of the PCB). 1.5 - 2mm would be a tougher job.> 0.7mm > https://www.digikey.co.uk/en/products/detail/sunled/XZCBDMEDGK161W/8259045 > https://www.digikey.co.uk/en/products/detail/sunled/XZCCBDMEDGK161W/10449771 > > >
Reply by ●October 8, 20232023-10-08
On 2023-10-08, Don Y wrote:> On 10/8/2023 4:32 AM, Dan Purgert wrote: >> [...] >> 2mm tall right-angle addressable (1-wire) things, >> and a quick spin through the datasheet shows the timing to be pretty >> much the same as the WS2812 or SK6812 options (aka "Neopixel", if you're >> familiar with Adafruit / Sparkfun). > > The internal driver is a win (I'd have to check to see if it has the > "problems" of the original 2812) as it saves some components and board > space. But, board space is easier to come by than assembly > *thickness*. :< 2mm on top of a ~1.5mm board brings me to 3.5mm. > Then, encapsulation adds to this. (I'd have to see if I can reduce > the thickness of the PCB substrate)Mount them to a flexible PCB or other "daughter-assembly" type thing? I've got a spool of WS2812's like that (albeit the standard perpendicular orientation rather than RA)... nice enough, and that flexible substrate is paper thin. -- |_|O|_| |_|_|O| Github: https://github.com/dpurgert |O|O|O| PGP: DDAB 23FB 19FA 7D85 1CC1 E067 6D65 70E5 4CE7 2860
Reply by ●October 8, 20232023-10-08
On 10/8/2023 12:23 PM, legg wrote:> On Sun, 8 Oct 2023 04:08:55 -0700, Don Y <blockedofcourse@foo.invalid> > wrote: > >> I need to mount (many) RGB indicators at right angle >> to the PCB (i.e., so the light travels parallel to the >> plane of the PCB) >> >> The entire assembly needs to be *really* thin. >> >> Using SMT components, it seems like I'd have to use >> lightpipes to bend the light (typically emitted normal >> to the PCB). This will add to the thickness of the assembly >> (board thickness + component + pipe) >> >> A better approach might be to use leaded components >> mounted on their sides AT the edge of the PCB and >> selecting them for smallest diameter possible (as >> this would conceivably be the largest dimension in the >> assembly's thickness). >> >> I'm looking for ~100K qty (LEDs) and can provide my own >> drive electronics (I looked at the "RGB LEDs with integrated >> drivers" and came up lacking). >> >> Another alternative might be SMT devices shining *through* >> the PBC into pipes -- the thickness of the PCB offsetting >> some of the required "height" of the pipe as it navigates >> its bend) >> >> I can't think of any other alternatives... > > I've used top-firing leds under a square rod of lexan, > machined along its length and painted white on the > machined surface.Hmmm... I'd have thought a (molded, rounded) surface would give the desired "reflection" (assuming compliant with refractive index). I wonder what the absorption losses are in the paint?> Viewed from the side, the eye sees the led projecting > on the white angled surface. Avoids annoying LED brightness > while still differentiating between adjacent indicators. > > Stick as many emitters as you want, side by side - just cut > the lexan rod to length to cover the group.This still doesn't avoid the "assembly thickness" issue. (crap, designing for "tiny" is *really* hard!) Or, the added assembly step (to machine & add the light pipe). I was hoping to buy a component with the light reoriented in the plane I wanted...> This was for battery charging/discharging/fault indicators. > > paint this surface > /l < view this surface. > illuminate from this ^.
Reply by ●October 8, 20232023-10-08
søndag den 8. oktober 2023 kl. 22.07.04 UTC+2 skrev Don Y:> On 10/8/2023 7:37 AM, Lasse Langwadt Christensen wrote: > > søndag den 8. oktober 2023 kl. 15.45.37 UTC+2 skrev Don Y: > >> On 10/8/2023 4:26 AM, Clive Arthur wrote: > >>> On 08/10/2023 12:08, Don Y wrote: > >>>> I need to mount (many) RGB indicators at right angle > >>>> to the PCB (i.e., so the light travels parallel to the > >>>> plane of the PCB) > >>>> > >>>> The entire assembly needs to be *really* thin. > >>>> > >>>> Using SMT components, it seems like I'd have to use > >>>> lightpipes to bend the light (typically emitted normal > >>>> to the PCB). This will add to the thickness of the assembly > >>>> (board thickness + component + pipe) > >>> > >>> <snip> > >>> > >>> Right angle RGB SM LED, first one found... > >>> > >>> https://www.digikey.co.uk/en/products/detail/everlight-electronics-co-ltd/EASV3015RGBA0/6156087 > >> I'm confused by the datasheet's dimensioning; on page 8, it appears > >> that the "dome" portion stands UP from the board instead of lying > >> on it. (i.e., the second illustration is labeled "Side" when > >> one would think it should be "Top"?) > > > > bottom right shows it mounted > Yes, a TOP view -- the lands on the PCB are clearly visible "under" > the device. But, note the "Side" view (above and to the left) shows > the same shape. (side should be "elevation" -- which should > yield a height/thickness figure) > > drawing says 1mm, how thin do you need? > I only see "1" referenced in the "Top" drawing. Their notion of > "top" seems couterintuitive.the left side shows the top,side,bottom of the _part_ right side the part mounted> > I can make 1mm work -- if that is actually the nominal height > of the component above the surface of the PCB (if I keep components > off the back side of the PCB).the part is 1mm +/-0.1mm with solder it'll be more> 1.5 - 2mm would be a tougher job. > > 0.7mm > > https://www.digikey.co.uk/en/products/detail/sunled/XZCBDMEDGK161W/8259045 > > https://www.digikey.co.uk/en/products/detail/sunled/XZCCBDMEDGK161W/10449771
Reply by ●October 8, 20232023-10-08
søndag den 8. oktober 2023 kl. 21.23.28 UTC+2 skrev legg:> On Sun, 8 Oct 2023 04:08:55 -0700, Don Y <blocked...@foo.invalid> > wrote: > >I need to mount (many) RGB indicators at right angle > >to the PCB (i.e., so the light travels parallel to the > >plane of the PCB) > > > >The entire assembly needs to be *really* thin. > > > >Using SMT components, it seems like I'd have to use > >lightpipes to bend the light (typically emitted normal > >to the PCB). This will add to the thickness of the assembly > >(board thickness + component + pipe) > > > >A better approach might be to use leaded components > >mounted on their sides AT the edge of the PCB and > >selecting them for smallest diameter possible (as > >this would conceivably be the largest dimension in the > >assembly's thickness). > > > >I'm looking for ~100K qty (LEDs) and can provide my own > >drive electronics (I looked at the "RGB LEDs with integrated > >drivers" and came up lacking). > > > >Another alternative might be SMT devices shining *through* > >the PBC into pipes -- the thickness of the PCB offsetting > >some of the required "height" of the pipe as it navigates > >its bend) > > > >I can't think of any other alternatives... > I've used top-firing leds under a square rod of lexan, > machined along its length and painted white on the > machined surface. > > Viewed from the side, the eye sees the led projecting > on the white angled surface. Avoids annoying LED brightness > while still differentiating between adjacent indicators. > > Stick as many emitters as you want, side by side - just cut > the lexan rod to length to cover the group. > > This was for battery charging/discharging/fault indicators. > > paint this surface > /l < view this surface. > illuminate from this ^.standard ones are not painted, https://www.ledtronics.com/Products/ProductsDetails.aspx?WP=321
Reply by ●October 8, 20232023-10-08
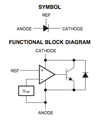
On Sun, 8 Oct 2023 07:19:29 -0700 (PDT), Anthony William Sloman <bill.sloman@ieee.org> wrote:>On Monday, October 9, 2023 at 12:45:37?AM UTC+11, Don Y wrote: >> On 10/8/2023 4:26 AM, Clive Arthur wrote: >> > On 08/10/2023 12:08, Don Y wrote: > ><snip> > >> https://www.digikey.co.uk/en/products/detail/everlight-electronics-co-ltd/EASV3015RGBA0/6156087 > >lets you download the datasheet, and on page 8 the second drawing on the left hand side of the page shows the peak height of the dome as 1.5+/-0.1mm > >That doesn't seem to include any solder filet under the device. Presumably the LEDs shoot sideways out of the side of the dome. > >> I'm confused by the datasheet's dimensioning; on page 8, it appears that the "dome" portion stands UP from the board instead of lying on it. (i.e., the second illustration is labeled "Side" when one would think it should be "Top"?) > >The dome doesn't seem to be any kind of lens but rather just a flattened blob over the the three-LED assembly.All wrong. https://www.dropbox.com/scl/fi/f6i3dc9qejklnc6swx744/RGB_1.jpg?rlkey=u4pocoachh1pzw6ncktqyeioh&dl=0
Reply by ●October 8, 20232023-10-08
søndag den 8. oktober 2023 kl. 16.19.34 UTC+2 skrev Anthony William Sloman:> On Monday, October 9, 2023 at 12:45:37 AM UTC+11, Don Y wrote: > > On 10/8/2023 4:26 AM, Clive Arthur wrote: > > > On 08/10/2023 12:08, Don Y wrote: > <snip> > > > https://www.digikey.co.uk/en/products/detail/everlight-electronics-co-ltd/EASV3015RGBA0/6156087 > > lets you download the datasheet, and on page 8 the second drawing on the left hand side of the page shows the peak height of the dome as 1.5+/-0.1mm > > That doesn't seem to include any solder filet under the device. Presumably the LEDs shoot sideways out of the side of the dome.no, the left side shows the _part_ in one orientation, not how it is mounted right side shows how the part is mounted laying on the board, light comes out the top of the dome, parallel to the board
Reply by ●October 8, 20232023-10-08
On 10/8/2023 1:08 PM, Dan Purgert wrote:> On 2023-10-08, Don Y wrote: >> On 10/8/2023 4:32 AM, Dan Purgert wrote: >>> [...] >>> 2mm tall right-angle addressable (1-wire) things, >>> and a quick spin through the datasheet shows the timing to be pretty >>> much the same as the WS2812 or SK6812 options (aka "Neopixel", if you're >>> familiar with Adafruit / Sparkfun). >> >> The internal driver is a win (I'd have to check to see if it has the >> "problems" of the original 2812) as it saves some components and board >> space. But, board space is easier to come by than assembly >> *thickness*. :< 2mm on top of a ~1.5mm board brings me to 3.5mm. >> Then, encapsulation adds to this. (I'd have to see if I can reduce >> the thickness of the PCB substrate) > > Mount them to a flexible PCB or other "daughter-assembly" type thing? > I've got a spool of WS2812's like that (albeit the standard > perpendicular orientation rather than RA)... nice enough, and that > flexible substrate is paper thin.Yeah, there are other thin substrates that can be used. But, seems silly to be mounting onto something "flimsy" and then potting the thing. I thought a traditional (thru-hole) device lying on its side, leads soldered to SMT pads on top (or bottom) of board would "hide" a good part of the device's *width* from the assembly's *thickness*: Top view PCB edge | | ==D LED facing east | | Side view --D ======= PCB I will have to rethink just how much I want to constrain the range of components I'm using (I use a SHITLOAD of these LEDs) and how I'm driving them (I *don't* use integrated drivers because they add cost, another failure mechanism and uncertainty of the device's state when the controlling element is indeterminate). Perhaps I can rationalize a different approach... Regardless, I should buy ~100 to play with (touchy-feely always makes visualization easier!)
Reply by ●October 9, 20232023-10-09
On Sun, 8 Oct 2023 15:48:12 -0700 (PDT), Lasse Langwadt Christensen <langwadt@fonz.dk> wrote:>s�ndag den 8. oktober 2023 kl. 21.23.28 UTC+2 skrev legg: >> On Sun, 8 Oct 2023 04:08:55 -0700, Don Y <blocked...@foo.invalid> >> wrote: >> >I need to mount (many) RGB indicators at right angle >> >to the PCB (i.e., so the light travels parallel to the >> >plane of the PCB) >> > >> >The entire assembly needs to be *really* thin. >> > >> >Using SMT components, it seems like I'd have to use >> >lightpipes to bend the light (typically emitted normal >> >to the PCB). This will add to the thickness of the assembly >> >(board thickness + component + pipe) >> > >> >A better approach might be to use leaded components >> >mounted on their sides AT the edge of the PCB and >> >selecting them for smallest diameter possible (as >> >this would conceivably be the largest dimension in the >> >assembly's thickness). >> > >> >I'm looking for ~100K qty (LEDs) and can provide my own >> >drive electronics (I looked at the "RGB LEDs with integrated >> >drivers" and came up lacking). >> > >> >Another alternative might be SMT devices shining *through* >> >the PBC into pipes -- the thickness of the PCB offsetting >> >some of the required "height" of the pipe as it navigates >> >its bend) >> > >> >I can't think of any other alternatives... >> I've used top-firing leds under a square rod of lexan, >> machined along its length and painted white on the >> machined surface. >> >> Viewed from the side, the eye sees the led projecting >> on the white angled surface. Avoids annoying LED brightness >> while still differentiating between adjacent indicators. >> >> Stick as many emitters as you want, side by side - just cut >> the lexan rod to length to cover the group. >> >> This was for battery charging/discharging/fault indicators. >> >> paint this surface > /l < view this surface. >> illuminate from this ^. > >standard ones are not painted, https://www.ledtronics.com/Products/ProductsDetails.aspx?WP=321It's not intended to be a light pipe, with colimated light that blinds annoyingly - just a visible indicator. You'd have to look at it to read it's information, though any change of color is immediately obvious. . . . . and is intended to avoid the multitude of single-vendor 'standards' - using a simple fab and available materials. Made my prototype from shop-floor scrap. Not everyone's cup of tea, but it worked in a traction vehicle's battery assembly. RL