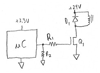


On 27 Feb 2020 07:07:11 -0800, Winfield Hill <winfieldhill@yahoo.com> wrote:>Winfield Hill wrote... >> >> I'm struggling with issues prototyping PCBs having >> ICs with a thermal pad. I assembled a new 100-volt >> buck converter powering a 12V fan, see schematic: >>https://www.dropbox.com/s/ypvtp2z74nudps7/RIS-796_3_Fan-supply_sch.JPG?dl=0 >> >> The circuit uses the elegant NSC LM5163, a 100V 0.5A >> 1MHz converter in an SO-8 PowerPad package. On the >> pcb layout, I had extended the thermal pad beyond >> the IC to allow access for a soldering-iron tip. >>https://www.dropbox.com/s/z13q7l2uiigi40r/RIS-796_3_Fan-supply_pcb.JPG?dl=0 >> >> After soldering the chip's 8 pins, I used a large flat >> tip to wick solder under the IC onto its thermal pad. >> At test, the circuit malfunctioned. Did I damage the >> IC while soldering? Removal was a pain. [ snip ] > > Looking at my layout, it was poorly done, perhaps even > causing the malfunction. Here's a redo from scratch. >https://www.dropbox.com/s/tv19qk065uu47k7/RIS-796_4_Fan-supply_pcb.JPG?dl=0Do you need to solder the power pad? Maybe use a bit of silicone grease or gap-pad if power is low. -- John Larkin Highland Technology, Inc The cork popped merrily, and Lord Peter rose to his feet. "Bunter", he said, "I give you a toast. The triumph of Instinct over Reason"
Best way to solder prototype pcb with thermal-pad ICs?
Started by ●February 27, 2020
Reply by ●February 27, 20202020-02-27
Reply by ●February 27, 20202020-02-27
On 2020-02-27 10:44, jlarkin@highlandsniptechnology.com wrote:> On 27 Feb 2020 01:29:55 -0800, Winfield Hill <winfieldhill@yahoo.com> > wrote: > >> I'm struggling with issues prototyping PCBs having >> ICs with a thermal pad. I assembled a new 100-volt >> buck converter powering a 12V fan, see schematic: >> https://www.dropbox.com/s/ypvtp2z74nudps7/RIS-796_3_Fan-supply_sch.JPG?dl=0 > > > I'm using these to go from 24 or 48 volts down to 12. > > https://www.digikey.com/products/en/power-supplies-board-mount/dc-dc-converters/922?k=srh05&k=&pkeyword=srh05&sv=0&pv1525=87718&sf=0&FV=-8%7C922&quantity=&ColumnSort=0&page=1&pageSize=25 > > It can do up to 72 volts in. > > My tiny pulse generator can be powered from 24 or 48 volt warts, so > this gets me down to the internal 12 volt rail, for secondary > regulators and fans. > > I think it will also do +48 to -12. Gotta try that. > >> >> The circuit uses the elegant NSC LM5163, a 100V 0.5A >> 1MHz converter in an SO-8 PowerPad package. > > > That sure has a lot of personality. > > > On the >> pcb layout, I had extended the thermal pad beyond >> the IC to allow access for a soldering-iron tip. >> https://www.dropbox.com/s/z13q7l2uiigi40r/RIS-796_3_Fan-supply_pcb.JPG?dl=0 >> >> After soldering the chip's 8 pins, I used a large flat >> tip to wick solder under the IC onto its thermal pad. >> At test, the circuit malfunctioned. Did I damage the >> IC while soldering? Removal was a pain. Using a talon >> tip failed to heat the pad, ditto for my hot-air system, >> only a giant flat tip applied to an exposed ground plane >> above the chip (see image) got everything hot enough to >> release the IC. I think I'll forgo soldering the pad, >> as the converter only dissipates 70mW with a 300mA load. >> >> But the experience makes me wonder, what's the best way >> to do prototype assembly of pcbs having thermal-pad ICs? > > Maybe use a baby-board, so if it fails, it doesn't have to be > unsoldered. Unsoldering power pads by hand is about impossible.A hot plate plus hot air usually works OK. Fancier hot air tools have rectangular nozzles for different package sizes. Cheers Phil Hobbs -- Dr Philip C D Hobbs Principal Consultant ElectroOptical Innovations LLC / Hobbs ElectroOptics Optics, Electro-optics, Photonics, Analog Electronics Briarcliff Manor NY 10510 http://electrooptical.net http://hobbs-eo.com
Reply by ●February 27, 20202020-02-27
On Thursday, February 27, 2020 at 4:30:10 AM UTC-5, Winfield Hill wrote:> I'm struggling with issues prototyping PCBs having > ICs with a thermal pad. I assembled a new 100-volt > buck converter powering a 12V fan, see schematic: > https://www.dropbox.com/s/ypvtp2z74nudps7/RIS-796_3_Fan-supply_sch.JPG?dl=0 > > The circuit uses the elegant NSC LM5163, a 100V 0.5A > 1MHz converter in an SO-8 PowerPad package. On the > pcb layout, I had extended the thermal pad beyond > the IC to allow access for a soldering-iron tip. > https://www.dropbox.com/s/z13q7l2uiigi40r/RIS-796_3_Fan-supply_pcb.JPG?dl=0 > > After soldering the chip's 8 pins, I used a large flat > tip to wick solder under the IC onto its thermal pad. > At test, the circuit malfunctioned. Did I damage the > IC while soldering? Removal was a pain. Using a talon > tip failed to heat the pad, ditto for my hot-air system, > only a giant flat tip applied to an exposed ground plane > above the chip (see image) got everything hot enough to > release the IC. I think I'll forgo soldering the pad, > as the converter only dissipates 70mW with a 300mA load. > > But the experience makes me wonder, what's the best way > to do prototype assembly of pcbs having thermal-pad ICs? > > > -- > Thanks, > - WinThere are assembly houses that will work these prototypes for way less than what it costs for you to do it, if you can wait a few days. Lots of really cheap vendors in China too. https://www.pad2pad.com/assembly/
Reply by ●February 27, 20202020-02-27
On Thu, 27 Feb 2020 07:47:21 -0800, jlarkin@highlandsniptechnology.com wrote:>On 27 Feb 2020 07:07:11 -0800, Winfield Hill <winfieldhill@yahoo.com> >wrote: > >>Winfield Hill wrote... >>> >>> I'm struggling with issues prototyping PCBs having >>> ICs with a thermal pad. I assembled a new 100-volt >>> buck converter powering a 12V fan, see schematic: >>>https://www.dropbox.com/s/ypvtp2z74nudps7/RIS-796_3_Fan-supply_sch.JPG?dl=0 >>> >>> The circuit uses the elegant NSC LM5163, a 100V 0.5A >>> 1MHz converter in an SO-8 PowerPad package. On the >>> pcb layout, I had extended the thermal pad beyond >>> the IC to allow access for a soldering-iron tip. >>>https://www.dropbox.com/s/z13q7l2uiigi40r/RIS-796_3_Fan-supply_pcb.JPG?dl=0 >>> >>> After soldering the chip's 8 pins, I used a large flat >>> tip to wick solder under the IC onto its thermal pad. >>> At test, the circuit malfunctioned. Did I damage the >>> IC while soldering? Removal was a pain. [ snip ] >> >> Looking at my layout, it was poorly done, perhaps even >> causing the malfunction. Here's a redo from scratch. >>https://www.dropbox.com/s/tv19qk065uu47k7/RIS-796_4_Fan-supply_pcb.JPG?dl=0 > >Do you need to solder the power pad? Maybe use a bit of silicone >grease or gap-pad if power is low.Or thermally conductive double-stick tape. That pad is electrically isolated. -- John Larkin Highland Technology, Inc The cork popped merrily, and Lord Peter rose to his feet. "Bunter", he said, "I give you a toast. The triumph of Instinct over Reason"
Reply by ●February 27, 20202020-02-27
On 27.02.20 9:29 am, Winfield Hill wrote: > After soldering the chip's 8 pins, […] thermal pad. > […]> But the experience makes me wonder, what's the best way > to do prototype assembly of pcbs having thermal-pad ICs?I've made good experiences doing it the other way round: Apply a little bit of solder directly onto the exposed pad with the iron. Then, add copious amounts of flux and use hot air to solder the pad while lightly pressing the chip down with tweezers to make sure the contact is good (and any excess solder is ejected to the side). Then, solder the pins as usual with the iron (either drag-solder, or just one by one for something fairly big like an SOIC-8). If there are any doubts about connectivity (or shorts), just reflowing the entire chip with hot air in the end tends to magically correct any misalignment, even with a thermal pad. Of course, this is predicated on having gotten the footprint right and using a sensible amount of solder. Like this, I never really had any issues soldering things like the 2 mm x 2 mm 6-pin LFCSPs that some of the ADPxxxx regulators come in, a number of TI's SOIC/TSSOP op amps, etc. I haven't needed to manually solder anything excessively sensitive to thermal stress in a while, though. If the thermal conductivity of the PCB is on the high side (heavy copper, aluminium substrate, etc.), doing the above with the board on a hot plate to pre-heat it evenly makes all the difference, and also helps to avoid thermal stress. — David
Reply by ●February 27, 20202020-02-27
Winfield Hill wrote...> > I'm struggling with issues prototyping PCBs having > ICs with a thermal pad. I assembled a new 100-volt > buck converter powering a 12V fan, see schematic: >https://www.dropbox.com/s/ypvtp2z74nudps7/RIS-796_3_Fan-supply_sch.JPG?dl=0 > > The circuit uses the elegant NSC LM5163, a 100V 0.5A > 1MHz converter in an SO-8 PowerPad package. On the > pcb layout, I had extended the thermal pad beyond > the IC to allow access for a soldering-iron tip. >https://www.dropbox.com/s/z13q7l2uiigi40r/RIS-796_3_Fan-supply_pcb.JPG?dl=0 > > [ snip ] I think I'll forgo soldering the pad, as > the converter only dissipates 70mW with a 300mA load.That calculation was based on a 15V input, where the upper high-Ron MOSFET, 725mR, is on most of the time. W/o the thermal pad connected, I measured 46C package temp for the chip and 49C for the inductor, 1.3 ohms, at 300mA. But when I raised Vin to 60V the chip temp rose to 100C and the inductor to 65C. So apparently the LM5163's switching losses mean it does indeed need its thermal pad connected. -- Thanks, - Win
Reply by ●February 27, 20202020-02-27
On 28/02/2020 01:50, Winfield Hill wrote:> George Herold wrote... >> >> On February 27, 2020, Winfield Hill wrote: >>> >>> ... what's the best way to do prototype assembly >>> of pcbs having thermal-pad ICs? >> >> With a bigger 8 SOIC pac. I had two plated holes where >> the pad was and hand soldered it from the back side. > > Yes, I've done that before, seemed to work OK. Just > forgot about it this time - getting used to doing it > right for automated assembly. I appreciated and liked > the advice from the three previous answers. I need to > step up my game, look into more and better soldering > equipment, but the hole-under trick is much easier. > >I've also done MLF/LFCSP by putting vias in the thermal pad under the chip and a large square pad on the back side of the board with a solder mask opening all over it. There were 5 plated through holes in a domino pattern in the thermal pad, ideally large enough to fit fine solder wire (0.25mm?) down the holes (0.4mm?). I would flux everything, then tack the part in place by soldering the pins, then flip it over and heat the big pad on the back with a Metcal iron and feed solder down one of the plated holes until it comes up through the other ones. I figure that if solder goes down one via and comes up the others, then there is enough solder on the thermal pad. If you have to, and provided the board is designed as described above, you can remove small LFCSP/MLF packages by reheating the thermal pad from the back with an iron, and eventually the solder on the pins should melt and you can pull it off, but hot air would be better as it would be quicker. The only parts I can recall damaging by heating were some LTM DC-DC converter modules that I failed to bake before reflowing the board. They were already soldered to the board when I wanted to add another BGA by vapour phase reflow. I baked the new parts that I was adding but it had not occurred to me to bake the populated board as well. Nearly all of the LTM parts died. Next time we baked them.
Reply by ●February 27, 20202020-02-27
On Thursday, February 27, 2020 at 5:53:32 PM UTC-5, Chris Jones wrote:> On 28/02/2020 01:50, Winfield Hill wrote: > > George Herold wrote... > >> > >> On February 27, 2020, Winfield Hill wrote: > >>> > >>> ... what's the best way to do prototype assembly > >>> of pcbs having thermal-pad ICs? > >> > >> With a bigger 8 SOIC pac. I had two plated holes where > >> the pad was and hand soldered it from the back side. > > > > Yes, I've done that before, seemed to work OK. Just > > forgot about it this time - getting used to doing it > > right for automated assembly. I appreciated and liked > > the advice from the three previous answers. I need to > > step up my game, look into more and better soldering > > equipment, but the hole-under trick is much easier. > > > > > > > I've also done MLF/LFCSP by putting vias in the thermal pad under the > chip and a large square pad on the back side of the board with a solder > mask opening all over it. There were 5 plated through holes in a domino > pattern in the thermal pad, ideally large enough to fit fine solder wire > (0.25mm?) down the holes (0.4mm?). I would flux everything, then tack > the part in place by soldering the pins, then flip it over and heat the > big pad on the back with a Metcal iron and feed solder down one of the > plated holes until it comes up through the other ones. I figure that if > solder goes down one via and comes up the others, then there is enough > solder on the thermal pad.Exactly right, at least two holes so you can see the solder flow via the other hole. And hey, then the big vias are filled with solder. George H.> > If you have to, and provided the board is designed as described above, > you can remove small LFCSP/MLF packages by reheating the thermal pad > from the back with an iron, and eventually the solder on the pins should > melt and you can pull it off, but hot air would be better as it would be > quicker. > > The only parts I can recall damaging by heating were some LTM DC-DC > converter modules that I failed to bake before reflowing the board. They > were already soldered to the board when I wanted to add another BGA by > vapour phase reflow. I baked the new parts that I was adding but it had > not occurred to me to bake the populated board as well. Nearly all of > the LTM parts died. Next time we baked them.
Reply by ●February 28, 20202020-02-28
On Thursday, 27 February 2020 20:51:30 UTC, Winfield Hill wrote:> Winfield Hill wrote... > > > > I'm struggling with issues prototyping PCBs having > > ICs with a thermal pad. I assembled a new 100-volt > > buck converter powering a 12V fan, see schematic: > >https://www.dropbox.com/s/ypvtp2z74nudps7/RIS-796_3_Fan-supply_sch.JPG?dl=0 > > > > The circuit uses the elegant NSC LM5163, a 100V 0.5A > > 1MHz converter in an SO-8 PowerPad package. On the > > pcb layout, I had extended the thermal pad beyond > > the IC to allow access for a soldering-iron tip. > >https://www.dropbox.com/s/z13q7l2uiigi40r/RIS-796_3_Fan-supply_pcb.JPG?dl=0 > > > > [ snip ] I think I'll forgo soldering the pad, as > > the converter only dissipates 70mW with a 300mA load. > > That calculation was based on a 15V input, where the > upper high-Ron MOSFET, 725mR, is on most of the time. > W/o the thermal pad connected, I measured 46C package > temp for the chip and 49C for the inductor, 1.3 ohms, > at 300mA. But when I raised Vin to 60V the chip temp > rose to 100C and the inductor to 65C. So apparently > the LM5163's switching losses mean it does indeed need > its thermal pad connected. > > Thanks, > - WinWin, You could try something like this: Chipquik SMDLTLFP This is a no-clean solder paste made from a tin, bismuth, silver alloy with a melting point of 138degC, available from Mouser, Digikey, Farnell etc. https://www.chipquik.com/datasheets/SMDLTLFP.pdf John
Reply by ●February 28, 20202020-02-28
jrwalliker@gmail.com wrote:> On Thursday, 27 February 2020 20:51:30 UTC, Winfield Hill wrote: >> Winfield Hill wrote... >>> >>> I'm struggling with issues prototyping PCBs having >>> ICs with a thermal pad. I assembled a new 100-volt >>> buck converter powering a 12V fan, see schematic: >>> https://www.dropbox.com/s/ypvtp2z74nudps7/RIS-796_3_Fan-supply_sch.JPG?dl=0 >>> >>> The circuit uses the elegant NSC LM5163, a 100V 0.5A >>> 1MHz converter in an SO-8 PowerPad package. On the >>> pcb layout, I had extended the thermal pad beyond >>> the IC to allow access for a soldering-iron tip. >>> https://www.dropbox.com/s/z13q7l2uiigi40r/RIS-796_3_Fan-supply_pcb.JPG?dl=0 >>> >>> [ snip ] I think I'll forgo soldering the pad, as >>> the converter only dissipates 70mW with a 300mA load. >> >> That calculation was based on a 15V input, where the >> upper high-Ron MOSFET, 725mR, is on most of the time. >> W/o the thermal pad connected, I measured 46C package >> temp for the chip and 49C for the inductor, 1.3 ohms, >> at 300mA. But when I raised Vin to 60V the chip temp >> rose to 100C and the inductor to 65C. So apparently >> the LM5163's switching losses mean it does indeed need >> its thermal pad connected. >> >> Thanks, >> - Win > > Win, > > You could try something like this: > Chipquik SMDLTLFP > > This is a no-clean solder paste made from a tin, bismuth, silver alloy > with a melting point of 138degC, available from Mouser, Digikey, Farnell etc. > > https://www.chipquik.com/datasheets/SMDLTLFP.pdf > > John >WHY do they mis-call it "no clean" when it needs to be cleaned up?